Supplies needed:
5 Tubes of choice. I am using the gorgeous artwork of Jamie Kidd. Her website is HERE and her tubes can be purchased at CILM
Teen Love SWA Exclusive scrap kit by Missy and Tammy which can be purchased
from Scraps With Attitude Thank you for the awesome kit Missy and Tammy
Mask of choice. I am using one called reginaredhearts but I have no idea where the mask came from,
so therefore am unaware of the TOU.
My supplies: The Mura word layer needed which you can grab HERE
Must have a working knowledge of PSP to continue.
OK, let’s begin:
Open the folders containing your supplies and minimize them till needed.
Open new image 700X700. We can crop and/or resize later. Fill canvas with white.
In your scrap folder you will find several subfolders. Some are Tammy’s part of the kit and others are Missy’s.
In Tammy’s papers folder. Find Paper 6. Duplicate it and close the original. Resize your duplicate to 700 X 700 pixels, copy and paste as new layer. Apply mask of choice to your paper layer, delete mask and merge group. Resize your mask layer 85%.
Open Tammy’s elements folder 1, Open Frame 6, duplicate and close original. Resize frame 20% then copy and paste as new layer above your mask layer on the tag we’re making.
Hide your mask layer in the layer pallet , then highlighting the frame layer, use your magic wand and select the area inside the frame. Modify/Expand by 8, click OK. Unhide the mask layer. You may want to rearrange the mask layer to suit. Leave selected
With your mask layer highlighted, open Missy’s paper folder and find Paper 11. Duplicate and close original, then resize to 700X 700 pixels. Copy and paste as new layer. With new paper layer highlighted go to Selections/Invert/delete. Now go to selections/Invert and leave selected still.
In My Supplies folder open the Mura copies layer. Copy and paste as a new layer above the paper layer we just did. Line up the words to suit then Selections/Invert/Delete/Deselect. Drop shadow of choice to the frame.
In Missy’s Elements folder open ribbons 2, 3 and 4. Duplicate each one and close originals. Resize each 20%. Adjust sharpness/Sharpen. Copy and paste on top of each other at the top right of your tag we’re creating. See my image for reference. I mirrored my yellow ribbon before arranging with the other two. Once happy with the positioning, drop shadow of choice to each ribbon and then merge the three of them together. Duplicate your ribbon layer and mirror. Position like in my image above.
In Tammy’s Elements 1 folder, open Button3. Duplicate and close original. Resize duplicate 30%, Sharpen, copy and paste as new layer. Arrange on top of one of the ribbon clusters. Add drop shadow of choice, duplicate and mirror the duplicate. Position on top of the other cluster.
Open your tube of choice. Copy and paste as new layer, making sure it is the top layer. Position to where the bottom of your tube lines evenly inside the frame. See my image for reference. Drop shadow.
Open Tammy’s Elements1 folder again. Find filmstrip 3. Duplicate and close original. Resize 40%. With top layer on the tag you’re making highlighted, paste the film strip as new layer and position like in my image above.
Hide all layers except the filmstrip layer. Using magic wand, tolerance set at 0, click inside each of the parts of the film strip. Modify/expand by 2. Flood selections with either a paper of your choice or a colour. I used #B9B9B9. Once filled, deselect, and then using magic wand, click inside just the first section, modify, expand by 2. Copy and paste your tube of choice as new layer. Position and selections/invert/delete/deselect. Do the same for the remaining 3 sections. Once all tubes sections have been done, add drop shadow to your face layers.
With filmstrip layer highlighted, add a gradient glow. I used the following settings
Drop shadow your filmstrip.
Add your copyright information and your name. Resize/crop if necessary.
If you choose not to animate you’re all done.
ANIMATION:
Ok, this is a bit detailed so read carefully. On your layer pallet, find the paper you used for the frame background. With that layer highlighted, copy. Open Animation Shop and paste as new image.
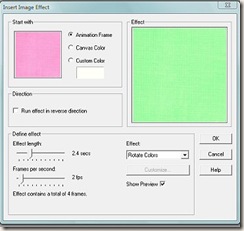
Go to Effects'/Insert Image Effects and from the effects drop down box choose ROTATE COLORS. I used the settings below.
This should leave you with 5 frames in your animation. I deleted frames 4 and 5 which left only the 3 colors I’d used of the ribbons.
Next, go back to PSP and hide all layers except your white background layer and your mask layer. Copy merged bkg/mask layer and paste as new Image in animation shop. Clicking inside your new image, duplicate selected frame twice, leaving you with a total of three frames.
Back to the rotating colors animation we made. Clicking in the first frame go to Edit/Select All/Copy. Now, highlighting your background mask image, click inside the first frame of it, and Edit/Select All/Paste into selected frame. Now you should have the color change animation and the background and mask together in one animation.
Now, back to PSP. Hide the mask and white background layers, and unhide all the others. Copy merge and then paste into animation shop as a new image. Duplicate twice giving you three frames again. With first frame highlighted, Edit/Select All/Copy. Highlight first frame of our merged animation we made, Edit/Select All/Paste into current frame. Carefully position into place so that the frame fits properly over the color changing background.
One last step before saving. On your final animated tag, with the first frame highlighted, Edit/Select All/ Then right clicking in that first frame choose Frame properties and set to 75 and click ok. Now save your tag and we’re all done.
Thank you for trying my tutorial


No comments:
Post a Comment