SUPPLIES NEEDED:
Tube of choice: I am using the wonderful artwork of Ted Hammond His tubes can be purchased at CILM
Star Word Shape which can be found at Misfits Scrapz Thank you Yvette for this wonderful share.Filters Needed: DSB Flux Bright Noise and Eye Candy Gradient Glow
Mask: I used a beautiful Mask By Vix which is included in my supplies. You can find many more masks at her site HERE Thank you Vix!
Also included in my SUPPLIES is my own word art.Let’s get started:
Open new image 700 X 700. We can resize later.Flood fill with white.
Copy and paste Yvette’s CU Star word shape as a new layer
Colorize to match the tube you plan to use.
Activate your shape tool, set to Star 2 shape with the following settings
Choose a color to match your tube for your foreground color and background color set to nil (hidden or closed off).
Draw a star shape large enough to frame your word shape. Stretch it out till none of the word shape shows outside your frame. Convert to raster layer.
Hide the star word art in your layer pallet. With Star Frame layer highlighted, activate your magic wand, tolerance set to zero, and click inside your frame, selecting the center area. Modify/expand by 10.
Create a new raster layer under the word art layer. Flood fill with color of choice. I used white. DESELECT
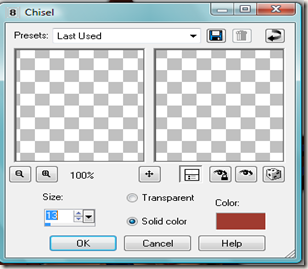
Highlight your star frame layer again and go to Effects/3D Effects/Chisel and apply using the following settings. Color set to a contrasting color to match your tube

Still on the star frame layer, click inside the original star frame (the part you had before applying the chisel effect) selecting that part only.
Leaving selected, duplicate this frame layer two times, giving you 3 star frame layers.
Hide the two duplicates for now and on the original frame layer apply Effects/Plug-ins//DSB Flux/Bright Noise with the following settings:

Hide the original frame layer and apply the same effect to the 2nd frame layer, but apply twice this time.
Hide this layer and apply the effect 3 times to the 3rd frame layer. Hide both duplicate frames, and unhide the original for now.
Copy and paste your tube as a new layer above the frame and position.
With your white background layer highlighted, new raster layer and flood fill with color of choice. Apply your mask. Delete mask layer and merge group. Resize layer to 85% and change transparency to about 30%
Add my word art, your copyright information and your name. I used A&S Black Swan which is a PTU font which I can’t supply for my name.
Crop or resize if necessary.
ANIMATION:
Copy and paste merged into animation shop as a new image. Back in PSP hide the original frame layer and unhide the first duplicate frame. Copy merged and paste into animation shop AFTER current frame. Back in PSP again, hide the 1st duplicate frame layer and unhide the 2nd duplicate frame. Copy merged and back in Animation shop, select the 2nd frame and paste after current frame and save your tag.
Thank you for trying my tutorial. If you try it, please leave me a comment.


No comments:
Post a Comment