Supplies Needed:
Tube of choice. I am using the gorgeous art of Keith Garvey, you can purchase a license to use his art HERE Blue Dreams Scrap Kit I Am a Modern Girl which you can find HERE and WSL Mask 220 which you can find HERE
I used the filters….
Penta.Com Color Dot,
Penta.com Dot and Cross and Eye Candy 4000
All of which are optional.
My Supplies which includes my diamond frame topper.
You can find HERE
Now, let's get started!
Open up your folder containing your scrap kit, then just minimize so that it's ready for you.
Open the diamond frame topper from my supplies,
then duplicate and close the original.
Open new image 700 x 700 pixels. Flood fill with white
Open your scrap kit and find BD-I am a modern girl-Paper8.
Copy the paper and paste as new layer.
Apply your mask and merge group.
I resized mine 105%.
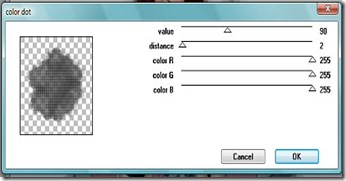
Next apply your filter Penta.com/color dot (optional)
I used the following settings:
Change the transparency on mask layer to 78%.
Now, find BD-I am a modern girl-Frame5.
Copy and paste as new layer, above your mask layer.
Hide the mask layer for now, and using your magic wand,
click inside the frame, being careful to choose the area below the ribbon wrap as well.
(In some versions of psp you must hold the shift key down to select more than one area).
Once both areas are selected, Selection/Modify/Expand by 5 and click ok.
Open BD-I am a modern girl-Paper7 and paste as a new layer directly under the frame.
Selections/Invert/Delete
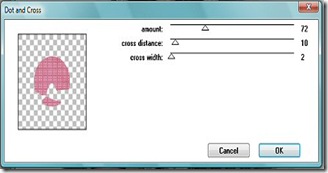
On this new paper layer apply filter Penta.com Dot and Cross with settings below
Unhide mask layer.
Next, open up your tube of choice and paste as new layer, between the frame and mask layers.
Position to your liking then duplicate this layer, and move the duplicate tube above the frame on the layer pallet. Hide duplicate for now
Back to original tube layer.
Making sure this layer is highlighted in the layer pallet, Selections/Invert/Delete to get rid of any of the tube showing outside frame.
Apply drop shadow of choice. I used 2 2 40 4 and then -2 -2 40 4.
Highlight your duplicate tube layer now (your top layer).
Using your eraser tool, erase all of the tube that is covering the bottom part of the frame and the frame wrap.
Once happy with the way it looks, highlight the frame layer and add drop shadow of choice.
Now's the time to add the diamond frame topper and carefully position on top of the frame and then add other elements of choice.
Drop shadow each one, then add your name and copyright information.
Crop and/or resize to taste.
Now, if you want to animate your tag like mine.....
highlight the diamond frame topper layer and duplicate it twice
(making a total of 3).
Close off the two copies for now and highlight the original frame topper.
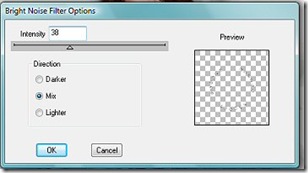
Go to plug-ins/DSB Flux/Bright Noise and apply the following settings.
Hide this layer and unhide duplicate1 of diamond frame topper.
Apply the filter to this layer as well with same settings.
Then repeat for a 2nd time.
Hide this layer now and unhide duplicate2 of diamond frame topper.
Apply the bright noise setting three times to this layer.
Hide layer.
Unhide the original diamond topper layer.
Copy merged and paste into animation shop
as new animation
Back to PSP and hide original topper layer and unhide the 1st copy layer. Copy merged.
Back to animation shop, right click on frame you had already copied over, and choose paste after current frame.
Then back to psp and hide 1st copy of topper, and unhide the top copy. Copy merged.
Back to animation shop
Highlight 2nd frame, right click and paste after current frame.
All done now, so just save your finished tag to your computer.
I would love to see your creations if you use my tutorial.




No comments:
Post a Comment